

Growing up, Easter was always a whirlwind of family, egg hunts, and, of course, delicious food. For years, I stuck to traditional cakes and pies, but one year, my little niece, beaming with excitement, asked if we could make something “super fun” and “egg-shaped” for the dessert table. That challenge sparked an idea that quickly became a cherished tradition: creating delightful, bite-sized treats that captured the spirit of the holiday.
We spent an afternoon laughing, mixing, and dipping, and the result was truly magical. Today, I’m thrilled to share with you my updated recipe for Easy Easter Egg Cake Pops! These adorable, customizable spheres of joy bring a smile to everyone’s face, whether you’re a seasoned baker or just starting out.
They are, without a doubt, the easiest and most charming way to celebrate spring. Let’s make some memories together with these fantastic Easy Easter Egg Cake Pops!
Why You’ll Love These Easy Easter Egg Cake Pops!
You are about to discover your new favorite Easter dessert! These Easy Easter Egg Cake Pops! are truly a revelation.
First and foremost, they are incredibly simple to make, even if you are new to the world of cake pops. Forget complicated techniques; my recipe streamlines the process for maximum fun and minimal fuss. Secondly, they are an absolute showstopper.
Their vibrant colors and charming egg shape instantly brighten any dessert spread, making them perfect for Easter gatherings, spring parties, or even just a delightful treat for your family. Furthermore, these delightful Easy Easter Egg Cake Pops! offer endless customization possibilities.
You can match your festive colors, play with different sprinkles, or even experiment with various cake and frosting flavors. They are wonderfully portable, ideal for bringing to a potluck or packing in a lunchbox. Most importantly, everyone adores them!
Kids love helping to decorate, and adults appreciate the perfectly portioned, delicious bite. You will find yourself reaching for this Easy Easter Egg Cake Pops! recipe year after year.
Ingredients You’ll Need
Gathering your ingredients is the first step toward creating these magnificent Easy Easter Egg Cake Pops! You likely have many of these staples already in your pantry. We use a boxed cake mix for ultimate ease, but you can certainly use your favorite homemade cake recipe if you prefer. Quality ingredients make a noticeable difference in the final product.

| Ingredient | Quantity | Notes |
Yellow Cake Mix | 1 (15.25 oz) box | Or your favorite flavor like vanilla, chocolate, or lemon |
Eggs | 3 large | Follow cake mix instructions |
Water | 1 cup | Follow cake mix instructions |
Vegetable Oil | 1/2 cup | Follow cake mix instructions |
Cream Cheese Frosting | 1 (8 oz) package | Store-bought is fine, or homemade cream cheese frosting
White Melting Wafers | 12-16 oz | Candy melts, almond bark, or white chocolate |
Food Coloring | Assorted gel colors | For vibrant dipping chocolate |
Sprinkles | Assorted Easter | Nonpareils, jimmies, sugar pearls, edible glitter |
Lollipop Sticks | 30-40 sticks | 4-inch or 6-inch sticks work best |
Shortening (optional) | 1-2 teaspoons | Helps thin melting wafers if needed |
Foam Block or Cake Pop Stand | 1 | For drying cake pops |
Substitutions & Variations
One of the joys of making Easy Easter Egg Cake Pops! is their incredible versatility. You can truly make this recipe your own!
* Cake Flavor: While yellow cake is a classic, feel free to experiment. Chocolate cake pops are always a hit, or try a lemon cake for a zesty spring flavor. Red velvet cake pops add a touch of elegance.
You could even use carrot cake mix for a unique twist.
* Frosting: Cream cheese frosting offers a delightful tang, but vanilla buttercream or chocolate frosting also work beautifully. Adjust the amount to achieve the perfect consistency for rolling your cake balls.
* Coating: White melting wafers provide a neutral base for coloring, but you can certainly use colored candy melts directly. Light green, pink, purple, or blue melts are fantastic for Easter. Dark chocolate or milk chocolate coatings also create a different flavor profile.
For a lighter, healthier option, consider dipping them in a thin glaze made from powdered sugar and milk.
* Decorations: This is where the real fun begins with your Easy Easter Egg Cake Pops! Beyond sprinkles, try edible glitter, crushed graham crackers for a “nest” effect, or mini chocolate chips.
You can drizzle contrasting colored chocolate over the dipped pops or use edible markers to draw intricate designs. Think beyond Easter too! Use different colored melts and sprinkles to create cake pops for birthdays, graduations, or Halloween.
* Shape: Instead of eggs, you can roll them into perfect spheres for a classic cake pop look. With a little creativity, you can even use small cookie cutters (like a mini bunny or chick) to shape the cake mixture before chilling.
One of the joys of making Easy Easter Egg Cake Pops! is their incredible versatility. You can truly make this recipe your own, and if you’re interested in exploring more delightful no-bake options, check out Strawberry Shortcake Truffles (Easy No-Bake Dessert Recipe!).
Step-by-Step Instructions
Making these Easy Easter Egg Cake Pops! is a rewarding process, and I am here to guide you every step of the way. Follow these instructions carefully, and you will achieve perfect results.
Note: This video is for demonstration purposes and may use a slightly different method.
1. Bake the Cake: First, prepare your cake mix according to the package directions, using a 9×13 inch baking pan. Allow the cake to cool completely in the pan on a wire rack.
This is crucial for proper crumbling.
2. Crumble the Cake: Once cooled, crumble the entire cake into a very large bowl.
Use your hands to break it into fine, uniform crumbs. Ensure no large lumps remain.
3.Mix with Frosting: Next, add about half of the container of cream cheese frosting to the cake crumbs. Using your hands, mix the frosting into the cake crumbs until thoroughly combined. The mixture should be moist enough to hold its shape when pressed together, but not sticky or greasy.
Add more frosting, a tablespoon at a time, if needed. You want a play-dough like consistency.
4.Shape the Eggs: Now, scoop out about 1 tablespoon of the cake mixture. Roll it between your palms to form an oval, slightly egg-like shape. Place the shaped egg onto a parchment-lined baking sheet.
Repeat with the remaining cake mixture. This recipe typically yields 30-40 Easy Easter Egg Cake Pops!.
5.Chill the Cake Eggs: Place the baking sheets with the shaped cake eggs into the refrigerator for at least 30 minutes, or the freezer for 15-20 minutes. Chilling is vital; it helps the pops hold their shape and prevents them from falling off the stick during dipping.
6.Melt the Coating: While the cake eggs chill, melt your white melting wafers. You can use a microwave-safe bowl, heating in 30-second intervals and stirring thoroughly after each, until smooth and fully melted. Alternatively, use a double boiler on the stovetop.
If the coating seems too thick, add a teaspoon of shortening to thin it slightly. Divide the melted white coating into several small bowls if you plan to color them different shades for your Easy Easter Egg Cake Pops!. Add a few drops of gel food coloring to each bowl and stir until you achieve your desired vibrant Easter shades.
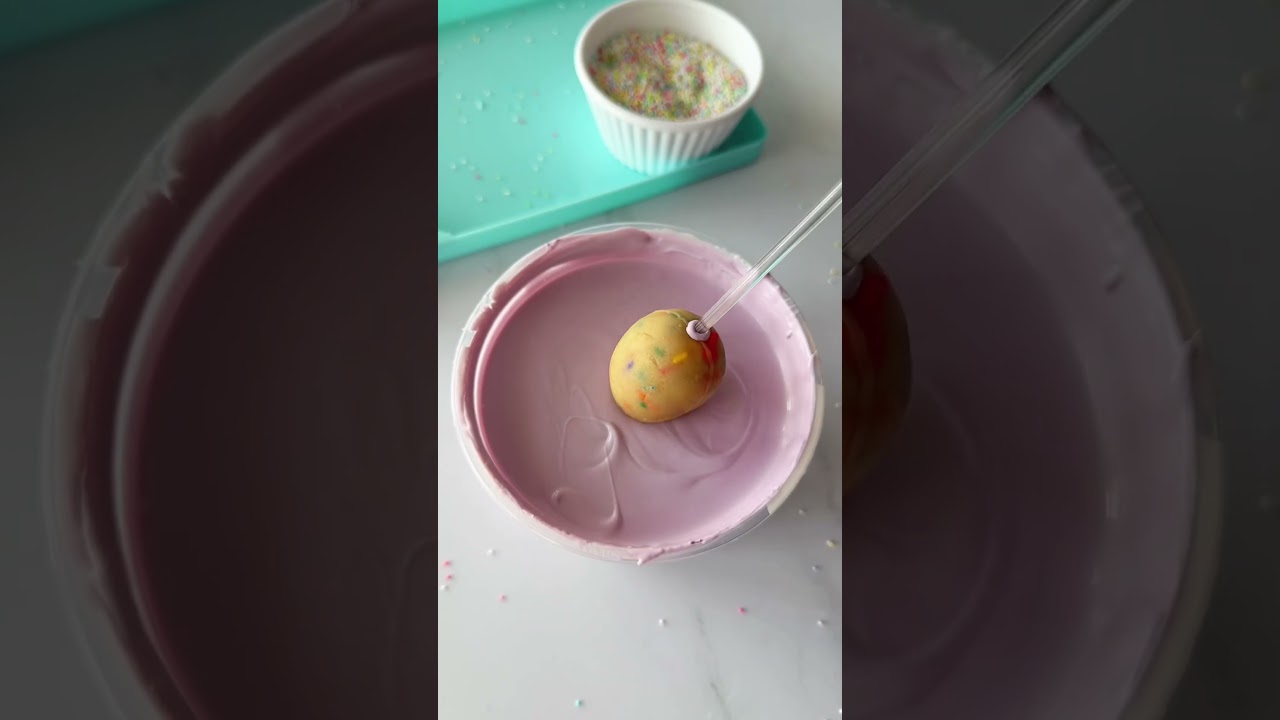
7. Dip the Sticks: Remove the chilled cake eggs from the refrigerator. Dip the tip of a lollipop stick about 1/2 inch into the melted coating, then immediately insert the coated stick into the bottom of a cake egg, pushing it about halfway through.
The melted candy acts as glue.
8. Dip the Cake Pops: Hold the cake pop by the stick and gently dip it into the melted coating, ensuring the entire egg is submerged.
Gently tap the stick against the side of the bowl to remove any excess coating. You want a smooth, even layer.
9.Decorate: Before the coating sets, immediately add your festive sprinkles or other decorations. This ensures they adhere properly to your beautiful Easy Easter Egg Cake Pops!
10.Dry: Insert the stick of the decorated cake pop into a foam block or cake pop stand to dry completely. This takes about 10-15 minutes, depending on your room temperature. Once set, your delightful Easy Easter Egg Cake Pops! are ready to enjoy!
Pro Tips for Success
With 20 years in the kitchen, I have picked up a few tricks that make all the difference, especially when creating something as precise and fun as Easy Easter Egg Cake Pops!
* Cake Crumble Consistency: Do not leave any large chunks! The finer the crumbs, the smoother and more uniform your cake pops will be. This prevents lumpy textures and makes shaping easier.
* Frosting Amount is Key: Adding too much frosting makes the mixture too sticky and difficult to roll, causing your cake pops to be greasy. Too little, and they will crumble. Aim for a consistency similar to play-dough.
It should hold its shape when squeezed but not be wet. Start with less and add more if needed.
* Chilling is Non-Negotiable: Seriously, do not skip chilling the shaped cake eggs.
This firms them up, preventing them from falling apart or creating cracks when dipped into the warm coating. A well-chilled cake pop holds its shape beautifully.
* Melting Wafers Correctly: Overheated chocolate or candy melts become thick and unworkable.
Heat slowly, in short bursts, stirring frequently. If it becomes too thick, add a teaspoon of vegetable shortening or a neutral oil (like canola) to thin it, but avoid adding water, as it will seize the chocolate. Keep the coating warm throughout the dipping process.
A double boiler or a slow cooker on the “warm” setting works well for this.
* Dipping Technique: Dip the cake pop straight down, then pull it straight up. Do not swirl or twist.
Gently tap the stick against the edge of the bowl to let excess coating drip off. This creates a smooth finish. If you tap too hard, the cake pop can detach!
* Decorate Immediately: Have all your sprinkles and decorations ready *before* you start dipping. The candy coating sets quickly, so you need to apply decorations right after dipping for them to stick.
* Patience with Drying: Let your Easy Easter Egg Cake Pops!
dry completely upright. Rushing this step can smudge your beautiful decorations or lead to flattened sides.
With 20 years in the kitchen, I have picked up a few tricks that make all the difference, especially when creating something as precise and fun as Easy Easter Egg Cake Pops! To refine your dessert skills further, consider trying Lotus Truffles (Easy No-Bake Biscoff Dessert in 10 Minutes!) as your next baking adventure.
Storage & Reheating Tips
Storing your beautiful Easy Easter Egg Cake Pops! properly ensures they remain fresh and delicious for as long as possible.
* Room Temperature: If your cake pops do not have a perishable filling or coating (like fresh cream), you can store them at cool room temperature in an airtight container for up to 2-3 days. Keep them away from direct sunlight or heat, as this can melt the coating.
* Refrigeration: For longer storage, or if you use a cream cheese-based frosting or a perishable coating, store your Easy Easter Egg Cake Pops!
in an airtight container in the refrigerator for up to 1 week. Layer them carefully with parchment paper between layers to prevent sticking and damaging the decorations.
* Freezing: You can freeze undecorated cake pop balls for up to 1 month.
Place them on a baking sheet to freeze solid, then transfer to a freezer-safe bag or container. When ready to use, thaw in the refrigerator, then proceed with dipping and decorating. For already dipped and decorated cake pops, freeze them on a baking sheet until solid, then transfer to an airtight container.
Thaw in the refrigerator overnight before serving. Do not refreeze thawed cake pops.
* Reheating: Cake pops are best served at cool room temperature.
No “reheating” is typically required. If refrigerated, let them sit out for 15-30 minutes before serving to soften slightly and enhance their flavor and texture.
What to Serve With This Recipe
These Easy Easter Egg Cake Pops! are delightful on their own, but they also make a fantastic addition to a larger Easter spread or any springtime celebration. They complement many other treats and beverages beautifully.
* Easter Brunch Spread: Pair these festive cake pops with other brunch favorites like mini quiches, fruit salad, deviled eggs, and hot cross buns. They add a sweet, colorful touch to a savory meal.
* Beverages: Serve them alongside a refreshing glass of iced tea, homemade lemonade, or a sparkling cider.
For adults, a mimosa or a light rosé would be a lovely complement. Hot coffee or tea also provides a comforting contrast to the sweetness.
* Other Desserts: Create a stunning dessert platter by combining your Easy Easter Egg Cake Pops!
with lemon bars, carrot cake cupcakes, chocolate-dipped strawberries, and individual fruit tarts. The variety of textures and flavors will impress your guests.
* Kid-Friendly Treats: For a children’s party, pair these with bunny-shaped cookies, gummy worms, and colorful fruit skewers.
The vibrant look of the Easy Easter Egg Cake Pops! will be a big hit!
* Ice Cream: For a decadent treat, serve one of these marvelous Easy Easter Egg Cake Pops!
alongside a scoop of vanilla bean ice cream. The cold creaminess provides a wonderful contrast to the dense cake pop.
These Easy Easter Egg Cake Pops! are delightful on their own, but they also make a fantastic addition to a larger Easter spread or any springtime celebration. For a complete feast, don’t miss out on our recipe for Lemon Curd Tart for easy Easter Dessert or Brunch Sweet Treat, which pairs beautifully with the cake pops.
FAQs
Can I make the cake pop mixture ahead of time?
Absolutely! You can prepare the cake and frosting mixture, shape it into eggs, and chill them for up to 2-3 days in the refrigerator before dipping. Ensure you store them in an airtight container to prevent them from drying out.
This makes preparing your Easy Easter Egg Cake Pops! a breeze for busy schedules.
Why are my cake pops cracking after dipping?
Cracking typically happens for a few reasons. Firstly, the cake mixture might be too cold or the candy coating too hot. The temperature shock causes the coating to contract and crack.
Make sure your cake eggs are chilled, but not frozen solid, and your coating is warm but not scorching. Secondly, a coating that is too thick can also cause cracks. Thin it slightly with shortening if needed.
Finally, if the cake pops are too dense or have air pockets, this can also lead to cracking. Ensure you mix the cake and frosting thoroughly and roll the eggs firmly. Fixing these issues will help you achieve perfect Easy Easter Egg Cake Pops!.
How do I prevent the cake pops from falling off the stick?
Several factors contribute to this common issue. Always dip the tip of the lollipop stick into the melted candy coating before inserting it into the cake egg. This “glue” helps secure the pop.
Ensure your cake eggs are sufficiently chilled and firm before dipping; soft cake pops detach easily. Also, avoid using too much frosting, which can make the cake mixture too soft and heavy. Finally, do not swirl or tap the cake pop too vigorously while dipping; a gentle, steady motion works best to keep your Easy Easter Egg Cake Pops! securely attached.
What if my candy melts are too thick?
If your candy melts or white chocolate seem too thick for smooth dipping, you can easily thin them. Add 1/2 to 1 teaspoon of vegetable shortening or a neutral oil (like canola or coconut oil) at a time, stirring thoroughly until you reach the desired consistency. Continue adding small amounts until the coating is fluid enough to easily coat your Easy Easter Egg Cake Pops!
without being too runny. Avoid adding water, as it will cause the chocolate to seize and become unusable.
Can I use homemade cake and frosting?
Yes, you certainly can! While this recipe emphasizes convenience with boxed cake mix and store-bought frosting, using your favorite homemade yellow cake and cream cheese frosting will yield incredibly delicious Easy Easter Egg Cake Pops! Just ensure your homemade cake is completely cooled and crumbled finely, and your homemade frosting has a firm consistency before mixing. You might need to adjust the amount of frosting slightly, as homemade versions can vary in moisture content.
Easy Easter Egg Cake Pops! are a fun and colorful treat that encapsulates the joy of Easter celebrations. These bite-sized desserts not only add a festive touch to any gathering but also offer great opportunities for creativity, allowing bakers to personalize flavors and decorations as they wish. Learn more about this delightful dessert by visiting the cake pop article.
Nutrition Information (per serving)
This information is an estimate based on approximately 35 cake pops per recipe, using standard ingredients. Exact values may vary based on specific brands and portion sizes. Enjoy these delightful Easy Easter Egg Cake Pops! responsibly!
| Nutrient | Amount (estimated) |
| :————– | :—————– |
| Calories | 180 kcal |
| Total Fat | 10g |
| Saturated Fat | 5g |
| Cholesterol | 20mg |
| Sodium | 120mg |
| Total Carbohydrate | 22g |
| Dietary Fiber | 0g |
| Total Sugars | 18g |
| Protein | 1g |
Easy Easter Egg Cake Pops!

Easy Easter Egg Cake Pops are adorable, customizable dessert treats that capture the spirit of Easter. They are simple to make and perfect for gatherings, offering endless decoration options.
- Prep Time: 20 mins
- Cook Time: 30 mins
- Total Time: 50 mins
- Yield: 30-40 servings
- Category: Dessert
- Method: Baking
- Cuisine: American
- Diet: Vegetarian
Ingredients
1 box Yellow Cake Mix
3 large Eggs
1 cup Water
1/2 cup Vegetable Oil
1 package (8 oz) Cream Cheese Frosting
12-16 oz White Melting Wafers
Assorted gel Food Coloring
Assorted Easter Sprinkles
30-40 Lollipop Sticks
1-2 teaspoons Shortening (optional)
1 Foam Block or Cake Pop Stand
Instructions
- Bake the cake according to package directions and cool completely
- Crumble the cooled cake into a large bowl until fine crumbs remai
- Mix in half of the cream cheese frosting until a play-dough consistency is achieved
- Scoop and roll about 1 tablespoon of the mixture into an egg shape and place on a lined baking sheet
- Chill the shaped eggs for at least 30 minutes
- Melt the white melting wafers until smooth and adjust with shortening if needed
- Dip the tip of a lollipop stick into the melted coating and insert it into the cake egg
- Dip the entire cake pop into the coating and tap to remove excess
- Immediately add sprinkles or decorations before the coating sets
- Dry upright in a foam block or cake pop stand
Notes
Allow cake pops to sit at room temperature for flavor and texture.
Store in an airtight container for up to 1 week if refrigerated.